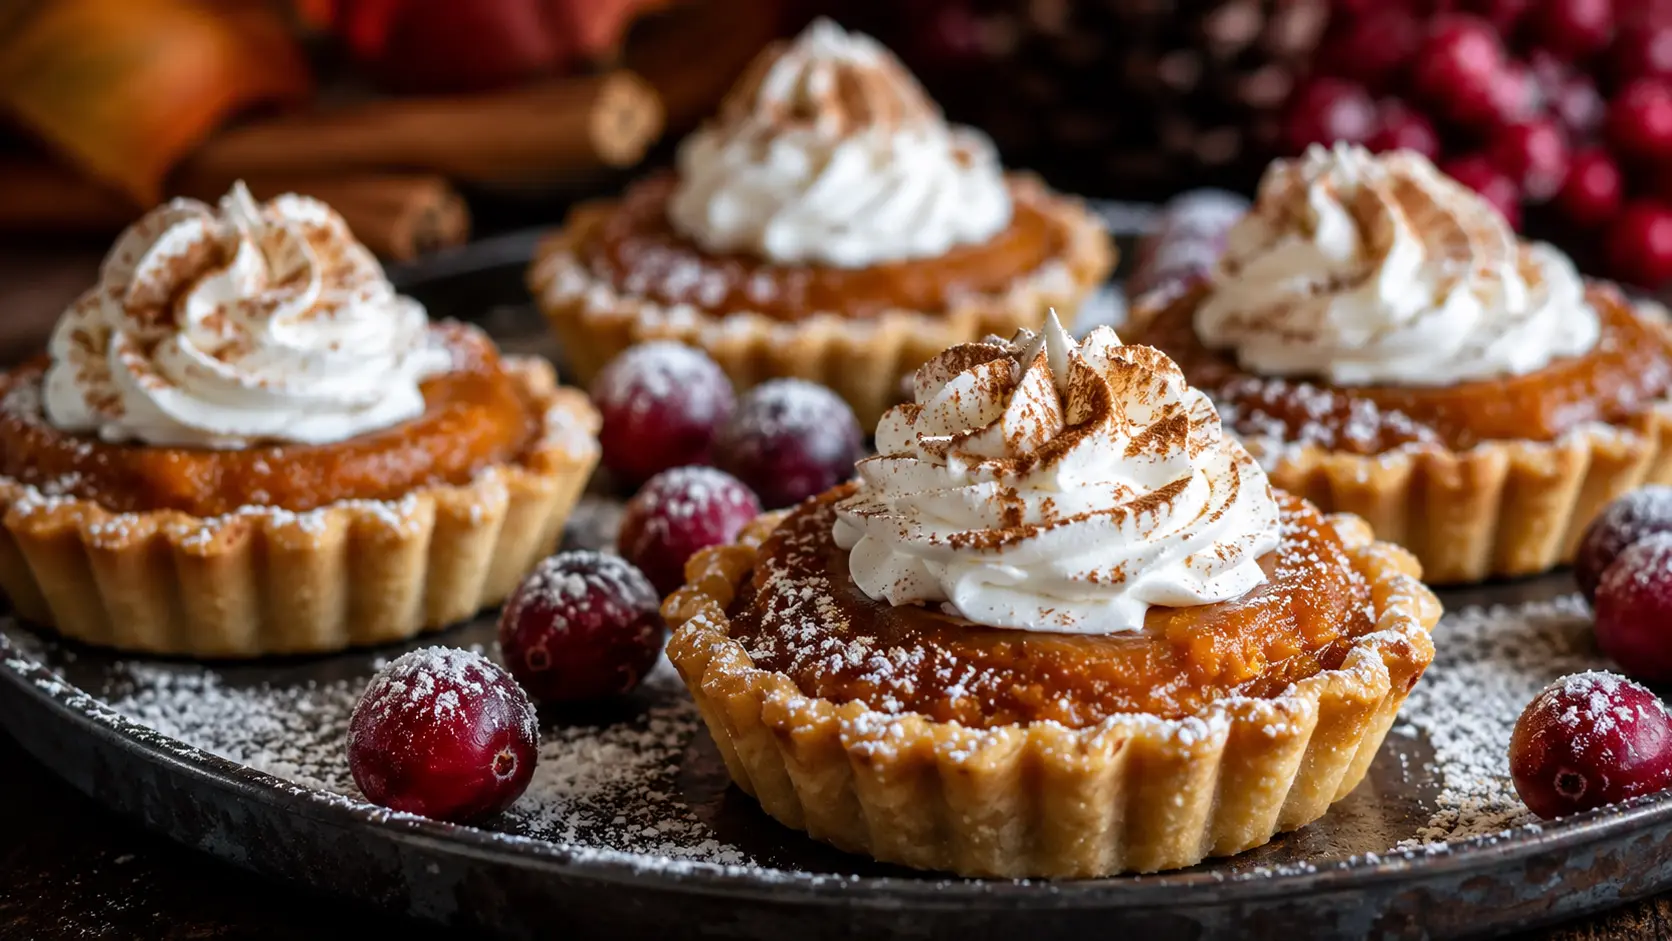
There is something quietly magical about pulling a tray of mini pumpkin pies from the oven when the air outside has that first real bite of autumn cold. The crust edges turn a warm, burnished gold. The filling puffs just slightly, carrying the scent of cinnamon and spice through every corner of the kitchen. And suddenly, the season is officially here.
Mini pumpkin pies take everything beloved about the Thanksgiving classic the creamy custard, the buttery shell, the warming spice and package it into a single, handheld bite. No slicing required. No uneven wedges. No scrambling for the right-sized plate. Just tidy little pies that travel well, store beautifully, and disappear from any table faster than you’d expect. Whether you’re hosting a holiday gathering, planning a potluck contribution, or simply craving fall comfort on a Tuesday, these minis deliver every single time.
Table of Contents
Mini Pumpkin Pies
Why Mini Pumpkin Pies Make Fall Baking Easier
The Comfort of Classic Pumpkin Pie in Small Servings
There is a reason mini pumpkin pies has anchored the American dessert table for generations. That combination of spiced custard and flaky pastry hits something deep warmth, memory, belonging. But a full pie comes with its complications. You need a proper pie dish. You need to slice cleanly. You need enough freezer space if you’re making ahead. And when you bring it to a gathering, you need someone willing to be the designated server.
Mini pumpkin pies solve all of that without sacrificing any of the flavor that makes the original so beloved. Each one holds all the richness of a traditional slice smooth pumpkin custard, a crust with real snap and butter depth, that signature spice profile of cinnamon, nutmeg, and ginger in a form that fits in one hand. Kids love them. Adults reach for seconds before they’ve finished the first. They plate beautifully on a dessert table alongside other fall sweets, and they never require anything more than a napkin.
The miniature format also makes the ratio of crust to filling more generous, which is honestly one of the greatest quiet improvements over the full-sized version. Every single bite has pastry. Every single bite has filling. There is no inner triangle of pure custard with no crust in sight. It is consistent from first bite to last, and that is worth a great deal.
A Make-Ahead Dessert for Holidays and Potlucks
Holiday baking is almost always a time management puzzle. The oven is in high demand. Counter space disappears. And you are somehow expected to produce a stunning dessert while simultaneously managing a roasted bird, a pot of mashed potatoes, and someone’s gluten restriction.
Mini pumpkin pies are one of the rare fall desserts that genuinely reward being made ahead of time. Both the pie dough and the spiced filling can be prepared a day or two before baking, kept refrigerated, and assembled when you’re ready. The fully baked pies hold well in the refrigerator for up to five days, meaning you can bake a complete batch on a Sunday and still serve them at Thursday’s Thanksgiving table without a second thought.
They also freeze exceptionally well up to three months making them the ideal candidate for October prep sessions when you have a free afternoon and want to get ahead of the holiday rush. Tuck them in a freezer-safe container with parchment between layers, and you have dessert sorted weeks in advance. For potlucks specifically, they are a dream: easy to transport in a covered container, no serving utensil required, and portioned to feed a crowd without any on-site work.
PrintMini pumpkin pies

These mini pumpkin pies feature flaky pastry shells filled with creamy pumpkin custard, brown sugar, vanilla, and warm fall spices. Bake them in a muffin tin for an easy individual dessert that suits Thanksgiving tables, autumn parties, and make-ahead holiday menus.
- Prep Time: 30 minutes
- Chill Time: 2 hours
- Cook Time: 25 minutes
- Total Time: 2 hours 55 minutes
- Yield: 48 mini pies 1x
- Category: Dessert
- Method: Baking
- Cuisine: American
- Diet: Vegetarian
Ingredients
- 2 unbaked pie crust rounds (homemade or store-bought)
- 1¼ cups plain pumpkin purée
- ¾ cup packed brown sugar
- ½ cup heavy cream
- ¼ cup whole milk
- 1 large egg
- 1 teaspoon ground cinnamon
- 1 teaspoon pumpkin pie spice
- ¼ teaspoon salt
- Pinch of black pepper (optional)
Method: Chill dough for at least 2 hours. Preheat oven to 375°F. Whisk all filling ingredients together until smooth, then refrigerate. Roll dough and cut 2.5-inch rounds. Press rounds into greased mini muffin tins. Fill each crust nearly to the top with chilled filling. Bake 21 to 25 minutes until edges are golden and centers are set. Cool 5 minutes in pan before removing. Serve with whipped cream and a dusting of cinnamon.
Instructions
- Chill pie dough for at least 2 hours.
- Preheat oven to 375°F (190°C). Grease a 24-cup mini muffin tin.
- Whisk together all filling ingredients until smooth. Refrigerate.
- Roll one dough disc on a lightly floured surface. Cut 24 rounds with a 2.5-inch cutter. Repeat with second disc.
- Press each round into a muffin well, shaping a flat base and even sides.
- Spoon or scoop chilled filling into each crust, leaving a small gap at the top.
- Bake 21–25 minutes until edges are golden and centers are set with no liquid jiggle.
- Cool in pan for 5 minutes, then remove and transfer to a wire rack.
- Serve at room temperature or chilled, topped with whipped cream and a pinch of cinnamon sugar.
Notes
- For gluten-free pies, substitute a gluten-free pie crust and chill thoroughly before rolling.
- Store refrigerated for up to 5 days or freeze for up to 3 months.
- Reheat from frozen: thaw overnight, then warm at 300°F for 8–10 minutes.
- For a denser, sweeter filling, substitute ¾ cup sweetened condensed milk for the cream, milk, and brown sugar.
- Black pepper in the filling is optional but genuinely recommended it adds warmth without heat.
Nutrition
- Serving Size: 1 mini pie
- Calories: 185 kcal
- Sugar: 10 g
- Sodium: 160 mg
- Fat: 8 g
- Saturated Fat: 3 g
- Unsaturated Fat: 4 g
- Trans Fat: 0 g
- Carbohydrates: 25 g
- Fiber: 1 g
- Protein: 3 g
- Cholesterol: 25 mg
What You Need to Make Mini Pumpkin Pies
Essential Ingredients for Flaky Crust and Smooth Filling
Getting the ingredients right is everything in a recipe this simple. With so few components, each one carries real weight.
For the Crust: Use two unbaked rounds of pie dough. Homemade dough made with a combination of butter and shortening gives the best result butter delivers that rich, layered flavor while shortening contributes tenderness and helps the crust hold its shape in a mini muffin cup. If time is short, a high-quality refrigerated store-bought crust works perfectly well. Avoid pre-formed tart shells, as they are sized and shaped for a different pan format and won’t fit a mini muffin tin properly.

For the Filling:
- 1¼ cups pumpkin purée — Canned is ideal for consistency. Use plain purée, not pumpkin pie filling, which is pre-sweetened and spiced and will throw off your ratios.
- ¾ cup packed brown sugar — Brown sugar adds caramel depth that white sugar simply cannot replicate. Light brown sugar keeps things subtle; dark brown sugar leans richer and more molasses-forward. Both work beautifully.
- ½ cup heavy cream + ¼ cup whole milk — This combination gives the filling its silky, set texture. Don’t substitute low-fat dairy here; the fat content is what allows the custard to hold together cleanly.
- 1 large egg — The binding agent that turns your spiced pumpkin mixture into a proper custard.
- 1 teaspoon cinnamon + 1 teaspoon pumpkin pie spice — Together these create the layered spice profile that makes the kitchen smell like fall the moment the oven door opens.
- ¼ teaspoon salt — Salt sharpens and deepens every other flavor in the filling.
- Pinch of black pepper (optional but recommended) — This sounds unexpected, and it is, in the best way. Black pepper adds a quiet brightness that lifts the whole filling without reading as heat. Try it once and you won’t bake without it again.
Smart Substitutions:
- Dairy-free? Swap the cream for full-fat coconut cream and the milk for oat milk. The filling will be very slightly softer but will still taste creamy and rich.
- Egg-free? A quarter cup of unsweetened applesauce will fill the binding role, though the texture will be a touch less firm.
- Gluten-free? Use a well-chilled gluten-free pie crust. The key is cold dough it rolls and handles much more successfully than warm gluten-free dough.
Muffin Tin Tips and Pastry Preparation
The equipment you use matters almost as much as the ingredients. A 24-cup mini muffin tin is the standard tool here, and nonstick versions make removal much easier. If your pan is older or prone to sticking, grease each well generously with butter or nonstick spray. Silicone mini muffin pans are an option and make removal very simple, though they conduct heat slightly differently and may require an extra two to three minutes of baking time.
For cutting the dough, a 2.5-inch round cutter is ideal. In a pinch, the rim of a small glass or a round measuring cup works just as well. You’ll get approximately 24 rounds per crust disc, and since this recipe uses two discs, you’ll have enough for a full batch of 48 mini pies. Roll scraps gently and re-cut just avoid overworking the dough, which develops the gluten and makes the crust tougher.
Keep everything cold. This is the single most important rule in pastry work. Chill your dough for at least two hours before rolling. Prepare and refrigerate your filling while you cut and press the crusts. Cold dough bakes into a crisp, defined shell. Warm dough slumps, tears, and loses that flakiness you’re after.
Step-by-Step Mini Pumpkin Pies Baking Guide
How to Shape, Fill, and Bake Each Pie
Step 1: Prepare the Filling In a large mixing bowl, whisk together the pumpkin purée, brown sugar, heavy cream, milk, egg, cinnamon, pumpkin pie spice, salt, and the optional pinch of black pepper. Mix until everything is completely smooth and uniform no streaks of egg, no lumps of sugar. The filling should be thick but pourable, somewhere between pancake batter and melted ice cream. Taste it. If it doesn’t make you want to grab a blanket and sit by a window, add a small extra pinch of cinnamon. Cover and refrigerate while you work on the crusts.
Step 2: Roll and Cut the Dough Lightly flour your work surface. Remove one disc of dough from the refrigerator and roll it out into a roughly 12-inch circle, working quickly to keep the dough cold. Use your 2.5-inch cutter to punch out as many rounds as possible, then gather the scraps, press them together gently, and re-roll for a second cut. Repeat with the second disc.

Step 3: Press Into the Muffin Tin Grease your mini muffin tin thoroughly. Take each dough round and press it carefully into a well, using your fingertips to flatten the base and push the sides up evenly. The edges may be slightly ragged that is perfectly fine and gives the pies a charming homemade look. If a round tears during pressing, use a small scrap of extra dough to patch it and press firmly.
Step 4: Fill Preheat your oven to 375°F (190°C). Using a small cookie scoop or a spoon, fill each crust with the chilled pumpkin mixture. Leave a small gap at the top about an eighth of an inch to allow for the slight puffing that happens during baking. Overfilling causes spillover, which is messy and can cause the pies to stick.

Step 5: Bake Bake for 21 to 25 minutes. The crust should be lightly golden at the edges and the filling should look puffed, slightly domed, and no longer liquid at the center. Remove from the oven and allow the pies to cool in the tin for five minutes before gently loosening them with a small offset spatula or spoon and transferring to a wire rack.
How to Tell When the Pumpkin Filling Has Set
This is the question that trips up most first-time custard bakers, and it’s worth taking a moment to explain the signs clearly.
An underbaked pumpkin custard will look wet and shiny across the entire surface. When you gently jostle the pan, the center will ripple and move like liquid. This is not ready.
A perfectly baked custard will look lightly puffed and matte rather than glossy. The edges will be fully set and the very center may have the faintest, barely perceptible jiggle similar to a just-set gelatin. A toothpick inserted near the center should come out with just a light smear, not completely clean (that would indicate overbaking) and not wet.
An overbaked custard will have visible cracks across the surface and will look dry at the edges. The texture will be grainy rather than smooth when you eat it.
The sweet spot is that window between the end of the wet, liquid stage and before any cracking appears. Your oven may run slightly hot or cool, so begin checking at the 21-minute mark and trust the visual cues over the timer.
Mini Pumpkin Pies Serving and Storage Guide
Best Toppings for a Cozy Fall Dessert
Mini pumpkin pies are completely satisfying served plain, but a few simple additions can turn them into something truly special.
Whipped cream is the obvious and correct first choice. A small rosette piped onto each pie with a star tip looks elegant on a dessert platter and takes only a few minutes. For something a step beyond standard, try sweetening mascarpone cheese with a tablespoon of powdered sugar and a splash of vanilla the result is creamier and more complex than regular whipped cream and holds its shape longer.
Cinnamon sugar sprinkled lightly over the whipped cream adds sparkle and an extra hit of warm spice. A single sugared cranberry placed on top of each pie brings a tartness that cuts through the sweetness beautifully and looks stunning on a holiday table.
A drizzle of warm caramel sauce over the tops just before serving is arguably the most crowd-pleasing option. Maple syrup glaze or a thin vanilla cream sauce work equally well for those who want something slightly lighter.

For beverages, mini pumpkin pies pair naturally with hot drinks spiced apple cider, chai tea, mulled wine, or a strong black coffee all complement the warm spice notes in the filling. For an adult gathering, a cinnamon-spiked bourbon cocktail alongside a tray of these pies is a combination that tends to generate recipe requests.
Refrigerating, Freezing, and Reheating Tips
Refrigerating: Once fully cooled, store the pies in an airtight container in the refrigerator. They will keep well for up to five days. Because the filling is custard-based, do not leave them at room temperature for longer than two hours.
Freezing: Mini pumpkin pies are excellent freezer candidates. Allow them to cool completely to room temperature, then place them in a single layer on a parchment-lined baking sheet and freeze for one hour. Once firm, transfer to a freezer-safe container, layering the pies with parchment paper to prevent sticking. Label with the date and freeze for up to three months.
Reheating from frozen: Transfer the pies from freezer to refrigerator the night before you need them for a slow, gentle thaw. When ready to serve, arrange on a baking sheet and warm in a 300°F (150°C) oven for 8 to 10 minutes. Add toppings only after reheating.
Reheating from refrigerated: A 300°F oven for 5 to 7 minutes is all that’s needed. Avoid the microwave if you can while it works in a pinch, it softens the crust significantly and is hard to time correctly on such small pieces.
Frequently Asked Questions About Mini Pumpkin Pies
Do I Have to Chill Mini Pumpkin Pies Before Baking?
The assembled pies do not need to be chilled before going into the oven. However, both the pie dough and the filling should absolutely be cold before you assemble them. Chilled dough holds its shape and bakes into a crisp shell rather than a pale, soft casing. Cold filling, meanwhile, contains the fat properly and prevents the custard from separating during baking. Once the pies are filled and ready, send them straight into the preheated oven for the best result.
How Long Do Mini Pumpkin Pies Last?
Stored in an airtight container in the refrigerator, mini pumpkin pies will stay fresh and delicious for up to five days. In the freezer, they keep well for up to three months when properly stored with parchment between layers to prevent sticking. At room temperature, they should not sit for longer than two hours due to the egg-and-dairy custard filling.
Can I Make Mini Pumpkin Pies Gluten-Free?
Yes, and the swap is straightforward. Simply replace the standard pie dough with a gluten-free pie crust recipe or a quality store-bought gluten-free dough. The most important detail is keeping the gluten-free dough very cold before rolling it is more fragile than wheat-based dough and benefits enormously from a thorough chill. Alternatively, you can press a gluten-free graham cracker and butter mixture directly into the mini muffin cups for an easy, no-roll crust option. The filling recipe itself is naturally gluten-free.
What’s the Difference Between Mini Pumpkin Pies and Pumpkin Pie Cheesecake?
Mini pumpkin pies are built on a custard filling pumpkin, dairy, egg, and spice which bakes into a smooth, lightly firm texture with a clean, spice-forward flavor. Pumpkin pie cheesecake introduces cream cheese into the equation, which produces a much denser, creamier result with a tanginess that balances the sweetness differently. The cheesecake version tends to be richer overall and less spice-prominent. Both are excellent fall desserts, but they serve slightly different cravings: the mini pies are lighter and more classic; the cheesecake is indulgent and more decadent.
Mini Pumpkin Pies and Pumpkin Pie Made With Sweetened Condensed Milk: What’s the Difference?
The version you’re reading uses brown sugar, heavy cream, and whole milk to build the filling, which gives you more control over the sweetness level and produces a slightly lighter, more delicate custard. Pumpkin pie made with sweetened condensed milk replaces those components with a single can of condensed milk, resulting in a noticeably sweeter, denser, almost fudgy texture. The condensed milk version is also slightly easier since it eliminates the step of separately measuring sugar and dairy. Both are genuinely delicious, but they produce distinctly different eating experiences. This recipe favors the brown sugar version for its nuanced, adjustable flavor.
Conclusion
Mini pumpkin pies are one of those recipes that earns a permanent place in your fall rotation not through complexity, but through dependability. They deliver exactly what you want from a fall dessert buttery crust, spiced custard, warmth in every bite with none of the stress that can come with full pie baking. They bake in under half an hour, scale up for any crowd, hold beautifully in the fridge or freezer, and look genuinely lovely on any dessert table.
Whether you make a single batch for a quiet Sunday at home or five batches in advance for a full holiday spread, the result is always the same: a dessert that tastes like autumn, that requires almost no attention after it goes in the oven, and that will reliably be the first thing gone from any plate you put it on. That’s the kind of recipe worth keeping.
Now go chill your dough and make a batch. The season is waiting.
Follow me on Pinterest for daily new recipes.